Halloween is the season of creativity, spooky fun, and, of course, unforgettable treats. While costumes and decorations set the mood, the food is what ties everything together. If you’re looking for a dessert that’s as fun to make as it is to eat, Spooky Spider Cookies are your answer.
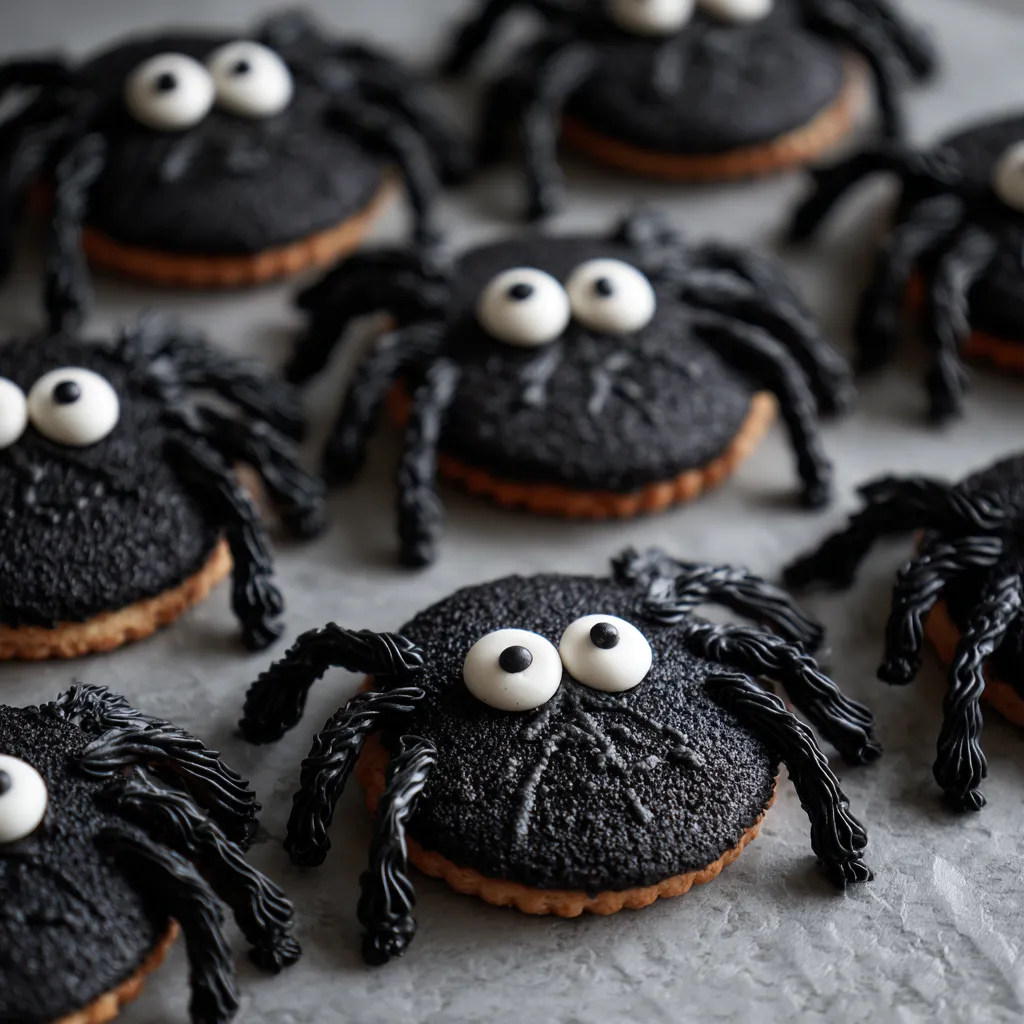
These cookies aren’t just delicious — they’re showstoppers. Imagine adorable spider-shaped treats with chocolate “bodies” and candy “eyes,” all sitting atop chewy, soft cookies. They’re kid-friendly, crowd-pleasing, and the perfect dessert for Halloween parties, bake sales, or even a spooky movie night.
In this ultimate guide, you’ll learn how to make Spooky Spider Cookies step by step, along with tips for decorating, variations, and serving ideas. By the end, you’ll be ready to create a plate of creepy-cute cookies that everyone will love.
Why You’ll Love Spooky Spider Cookies
- Festive & fun – Perfect for Halloween parties or school events.
- Kid-friendly – Children can help decorate and create their own spooky designs.
- Versatile – Works with chocolate chip cookies, peanut butter cookies, or sugar cookies.
- Easy to customize – Use different candies for eyes or bodies for endless creativity.
Whether you’re a baking pro or a beginner, these cookies will impress without requiring advanced pastry skills.
Ingredients for Spooky Spider Cookies
Here’s what you’ll need to create about 24 cookies:
For the Cookies (Base)
- 1 cup (2 sticks) unsalted butter, softened
- 1 cup granulated sugar
- 1 cup packed brown sugar
- 2 large eggs
- 2 teaspoons vanilla extract
- 2 ¾ cups all-purpose flour
- 1 teaspoon baking soda
- ½ teaspoon baking powder
- ½ teaspoon salt
- 1 ½ cups chocolate chips (optional, for added richness)
For the Spider Decoration
- 24 round chocolate truffles (like Lindt or Reese’s peanut butter cups mini) – spider “bodies”
- ½ cup chocolate chips (melted, for spider legs)
- 48 small candy eyes (2 per cookie)
- Additional candies (optional – M&Ms, Skittles, or sprinkles for variety)
Kitchen Tools Needed
- Large mixing bowls
- Hand mixer or stand mixer
- Measuring cups and spoons
- Baking sheets
- Parchment paper
- Cooling rack
- Piping bag or zip-top bag (for chocolate legs)
- Spatula and spoon
Step-by-Step Preparation Instructions
Step 1: Preheat and Prepare
Preheat your oven to 350°F (175°C). Line baking sheets with parchment paper to prevent sticking.
Step 2: Make the Cookie Dough
- In a large bowl, cream together the butter, granulated sugar, and brown sugar until light and fluffy.
- Add the eggs one at a time, mixing well after each addition. Stir in the vanilla extract.
- In a separate bowl, whisk together the flour, baking soda, baking powder, and salt.
- Gradually add the dry ingredients to the wet mixture, mixing until combined.
- Fold in chocolate chips if desired.
Step 3: Bake the Cookies
Scoop dough onto prepared baking sheets (about 1 ½ tablespoons per cookie). Leave enough space for spreading. Bake for 10–12 minutes or until edges are golden brown. Allow cookies to cool slightly on the tray before transferring to a cooling rack.
Step 4: Prepare the Spider Decorations
While cookies are still slightly warm, press one chocolate truffle into the center of each cookie to form the spider’s “body.”
Step 5: Add the Legs
Melt chocolate chips and transfer to a piping bag or zip-top bag. Snip the corner and pipe 4 legs on each side of the truffle, letting the chocolate set as it cools.
Step 6: Attach the Eyes
Use a dab of melted chocolate to attach two candy eyes onto each truffle. Let cookies cool completely so the decorations set.
Step 7: Serve and Enjoy!
Arrange cookies on a spooky platter, and watch the smiles (and maybe playful chills) appear when guests see their edible spiders.
Helpful Tips for Making Spooky Spider Cookies
- Timing is key – Add the truffles while the cookies are still slightly warm so they stick properly.
- Stabilize the eyes – If candy eyes fall off, apply a bit more melted chocolate as glue.
- Alternative spider bodies – Try Rolos, mini peanut butter cups, or Maltesers.
- No piping bag? – Use a zip-top bag with the tip cut off for easy chocolate piping.
- Kid activity – Let children decorate their spiders with different candies, turning baking into a fun Halloween craft.
Variations of Spooky Spider Cookies
- Peanut Butter Spider Cookies – Use peanut butter cookies as the base for a sweet-and-salty twist.
- Sugar Spider Cookies – Classic sugar cookies provide a lighter, buttery flavor.
- Gluten-Free Option – Substitute with gluten-free flour blends.
- Vegan Spider Cookies – Use dairy-free butter, plant-based chocolate, and egg replacers.
- Spooky Monster Mix – Add colorful sprinkles or candy corn around the spiders for a festive Halloween vibe.
Serving Suggestions
- Halloween Party Platter – Arrange cookies with cupcakes, candy apples, and pumpkin-shaped treats.
- School Bake Sale – Individually wrap cookies in cellophane bags with festive ribbons.
- Trick-or-Treat Surprise – Offer cookies as a homemade treat for family and friends.
- Movie Night – Pair with hot cocoa or pumpkin spice lattes for a cozy Halloween evening.
Nutritional Value (per cookie, approx.)
- Calories: 240
- Carbs: 32g
- Sugars: 20g
- Fat: 11g
- Protein: 3g
- Fiber: 1g
Values may vary depending on ingredients used.
The Connection Between Spooky Spider Cookies and Holiday Classics
Interestingly, treats like Spooky Spider Cookies share the stage with savory holiday staples such as Green Bean Casserole. While the casserole dominates Thanksgiving tables, spider cookies shine during Halloween. Both are seasonal favorites that bring people together, reminding us that food is more than fuel — it’s about tradition, celebration, and memories.
Frequently Asked Questions (FAQs)
Q: Can I make Spooky Spider Cookies in advance?
Yes! Bake the cookies a day ahead, store them in an airtight container, and decorate the day of serving.
Q: How do I store leftover cookies?
Keep in an airtight container at room temperature for up to 4 days, or refrigerate for up to a week.
Q: Can I freeze them?
Yes, but freeze undecorated cookies. Add spider decorations after thawing for the best look.
Q: What if I don’t have candy eyes?
Use white chocolate chips with a dot of melted dark chocolate for DIY eyes.
Q: Are these safe for school parties?
Yes, just be mindful of nut allergies if using peanut butter candies.
Conclusion
When it comes to Halloween baking, Spooky Spider Cookies are the ultimate crowd-pleaser. They’re simple to make, incredibly versatile, and guaranteed to bring joy (and maybe a few playful shivers) to anyone who sees them. Whether you’re making them for a classroom party, a family gathering, or just as a fun kitchen project, these cookies embody everything we love about Halloween: creativity, sweetness, and a little spooky charm.