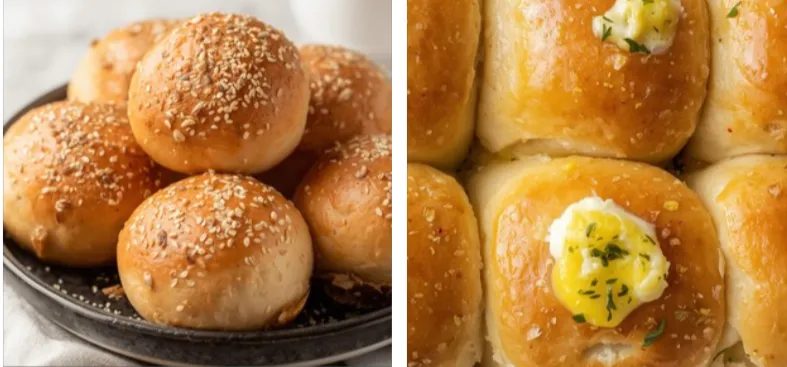
If there’s one aroma that can make any kitchen feel warm and inviting, it’s freshly baked bread with the rich scent of garlic and butter. Garlic Butter Dinner Rolls are not just a side dish — they’re the heart of comfort food, the perfect companion to soups, salads, roasts, and pastas. Whether you’re preparing for a festive dinner, a Sunday meal with family, or just craving something homemade and buttery, these rolls will make your table shine.
In this comprehensive post, we’ll explore how to make the most tender, fluffy, and flavorful Garlic Butter Dinner Rolls from scratch. You’ll learn everything — from the science of perfect yeast dough to the secret behind that shiny golden crust and melt-in-your-mouth texture.
Why Garlic Butter Dinner Rolls Are So Loved
Garlic butter dinner rolls combine three of the best comfort elements: soft bread, rich butter, and the bold aroma of garlic. They’re a perfect upgrade to plain dinner rolls, bringing extra depth and a gourmet touch to your meal.
Here’s why everyone loves them:
- Soft and pillowy texture: When made right, these rolls have a cloud-like interior that stays moist for days.
- Buttery garlic glaze: The combination of melted butter, fresh garlic, and herbs adds a rich savory flavor.
- Versatile for any meal: Serve them with soups, roasts, grilled meats, or as sliders for sandwiches.
- Perfect for holidays: Thanksgiving, Christmas, Easter — these rolls fit beautifully on any celebratory table.
- Easy to make ahead: You can prepare the dough ahead of time and bake them fresh when needed.
Ingredients You’ll Need
Making these rolls is surprisingly simple. The magic lies in using quality ingredients and handling them the right way.
For the Dough:
- 3 ½ cups all-purpose flour
- 2 ¼ tsp active dry yeast
- 1 cup warm milk (around 105–110°F)
- ¼ cup granulated sugar
- 1 tsp salt
- 1 large egg
- ¼ cup unsalted butter, softened
the Garlic Butter Topping:
- 4 tbsp unsalted butter, melted
- 3 garlic cloves, finely minced
- 1 tbsp chopped parsley (fresh or dried)
- Optional: pinch of salt or parmesan for garnish
Step-by-Step Guide: How to Make Garlic Butter Dinner Rolls
1: Activate the Yeast
Start by mixing warm milk, sugar, and yeast in a bowl. Let it sit for about 10 minutes until the mixture becomes foamy. This step ensures the yeast is alive and ready to make your rolls rise beautifully.
Pro Tip: If your yeast doesn’t foam up, it might be expired or the milk too hot. Try again with new yeast or cooler milk.
2: Mix the Dough
In a large mixing bowl, combine the flour and salt. Add in the foamy yeast mixture, softened butter, and the egg. Mix until a soft dough forms.
If you’re using a stand mixer, use the dough hook attachment and knead for about 8 minutes on medium speed. By hand, it might take around 12–15 minutes.
The goal: a smooth, elastic dough that’s slightly tacky but not sticky.
3: First Rise
Place the dough in a greased bowl, cover with a clean towel, and let it rise for 1 to 1.5 hours in a warm place. The dough should double in size.
4: Shape the Rolls
Punch down the dough to release air. Divide it into 12 equal pieces (or 16 for smaller rolls). Shape each piece into a smooth ball and place them in a greased baking dish or on a lined baking tray.
5: Second Rise
Cover the rolls again and let them rise for about 30–45 minutes, until puffy and touching each other.
6: Bake
Preheat your oven to 375°F (190°C). Bake for 18–22 minutes, or until golden brown on top.
7: Garlic Butter Glaze
While the rolls bake, prepare the garlic butter topping. Melt butter in a small pan, add minced garlic, and sauté gently for 1 minute until fragrant. Stir in parsley.
As soon as the rolls come out of the oven, brush them generously with the garlic butter. The warm bread will soak up the flavor beautifully.
The Secret to Perfect Garlic Butter Dinner Rolls
1. Warm ingredients:
Cold milk or butter can slow yeast activity, resulting in dense rolls. Always use room-temperature or slightly warm ingredients.
2. Don’t rush the rise:
Patience is key. Letting the dough rise fully gives you that airy texture.
3. Use bread flour (optional):
If you want extra chewiness and height, substitute half of the flour with bread flour.
4. Brush twice with garlic butter:
For extra shine and flavor, brush once when hot, and again after 5 minutes.
5. Rest before serving:
Allow rolls to cool slightly before serving so the butter fully sets inside.
Flavor Variations to Try
- Cheesy Garlic Rolls: Add shredded mozzarella or parmesan on top before baking.
- Herb Butter Rolls: Mix Italian herbs, thyme, or rosemary into the garlic butter.
- Honey Garlic Rolls: Add 1 tablespoon of honey to the melted butter for a sweet-savory twist.
- Stuffed Rolls: Fill the dough balls with cheese or garlic cream for a surprise center.
- Vegan Version: Replace butter with olive oil and milk with almond milk.
How to Serve Garlic Butter Dinner Rolls
These rolls are incredibly versatile and can be served with almost anything. Here are some ideas:
- With soups: Perfect with creamy tomato soup, chicken noodle soup, or mushroom bisque.
- Alongside main dishes: Serve them with roasted chicken, steak, or pasta.
- For holidays: A must-have on Thanksgiving or Christmas tables.
- As sliders: Cut them in half and fill with pulled chicken, turkey, or ham.
- For breakfast: Toast leftover rolls with butter and jam for a delicious start to your day.
Storage and Freezing Tips
To store:
Keep rolls in an airtight container at room temperature for up to 3 days.
To reheat:
Warm them in the oven at 300°F for 5–7 minutes, or in the microwave for 20 seconds.
freeze:
Once baked and cooled, place rolls in a freezer bag for up to 3 months. Reheat directly from frozen in a 350°F oven for 10 minutes.
Troubleshooting Common Issues
Rolls too dense?
The dough wasn’t kneaded enough or didn’t rise long enough.
Rolls too dry?
You may have added too much flour or baked them a bit too long.
Not enough garlic flavor?
Increase garlic quantity or use roasted garlic for deeper flavor.
Uneven browning?
Rotate the baking pan halfway through baking.
Nutritional Information (per roll)
- Calories: 180
- Carbohydrates: 25g
- Protein: 4g
- Fat: 7g
- Fiber: 1g
- Sugar: 3g
(Values are approximate and depend on ingredient brands.)
Make It Ahead: The Overnight Method
If you want fresh rolls in the morning or just before dinner without the hassle:
- Prepare the dough and let it rise once.
- Shape the rolls, cover, and refrigerate overnight.
- The next day, let them sit at room temperature for 45 minutes.
- Bake as directed.
This method saves time and enhances the flavor through slow fermentation.
Pairing Ideas for a Complete Meal
Garlic Butter Dinner Rolls shine when paired with rich, hearty dishes. Here are some perfect pairings:
- Main dishes: Garlic Butter Shrimp, Creamy Tuscan Chicken, or Slow-Cooked Beef Stew.
- Salads: Caesar Salad, Greek Salad, or Roasted Vegetable Salad.
- Soups: Creamy Potato Soup, Chicken Corn Chowder, or Broccoli Cheddar Soup.
Healthier Alternatives
Want to make them a bit lighter? Try these swaps:
- Use whole wheat flour for extra fiber.
- Replace part of the butter with olive oil.
- Use skim milk instead of whole milk.
- Add chia seeds or flaxseed to the dough for nutrition.
Why These Rolls Are Perfect for Pinterest
Garlic Butter Dinner Rolls are visually irresistible — glossy, golden, and fluffy. Their combination of comfort and simplicity makes them a high-performing pin on Pinterest. Food lovers searching for “easy dinner rolls,” “holiday bread,” or “garlic butter recipes” are likely to engage, save, and share.
To make your pin stand out:
- Use a bright, close-up photo showing the rolls brushed with melted butter.
- Add text overlay: “Soft Garlic Butter Dinner Rolls – Easy & Fluffy!”
- Include hashtags like #garlicbread #dinnerrolls #homemadebread #comfortfood.
- Write a detailed description (like the one above) with emotional and sensory words.
Final Thoughts
Garlic Butter Dinner Rolls are more than just bread — they’re an experience of warmth, comfort, and homemade love. Their soft, pillowy texture and buttery garlic flavor make them unforgettable. Once you master this recipe, it will become your go-to side dish for every occasion, from casual dinners to festive celebrations.