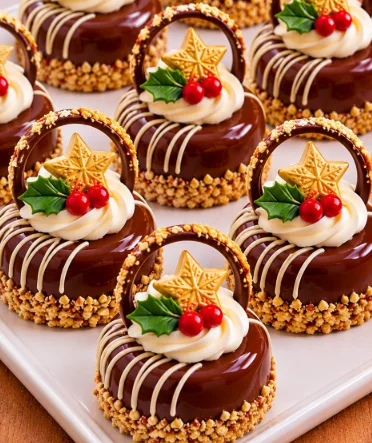
Christmas is the perfect season to create desserts that are not only delicious but also beautifully presented. These Christmas Chocolate Mousse Mini Cakes combine rich chocolate flavor, a soft cake base, silky chocolate mousse, glossy chocolate glaze, and elegant festive decorations.
Each individual cake is topped with a delicate chocolate ring, a swirl of creamy vanilla frosting, golden Christmas stars, and vibrant holly leaves with bright red berries. The result is a luxurious dessert that looks like it came straight from a professional pastry shop.
Whether you’re planning a Christmas dinner, hosting a holiday party, or preparing a festive dessert table, these stunning mini chocolate cakes will impress your family and guests.
Best of all, you can prepare most of the components in advance, making them a wonderful choice for busy holiday celebrations.
Recipe Overview
-
Preparation Time: 45 minutes
-
Baking Time: 15–18 minutes
-
Chilling Time: 4–6 hours
-
Decorating Time: 40 minutes
-
Total Time: Approximately 6–8 hours, including chilling
-
Servings: 8 individual mini cakes
-
Difficulty: Intermediate
-
Equipment: 8 mini cake molds or pastry rings, approximately 3 inches (7–8 cm) wide
Ingredients
For the Chocolate Sponge Cake Base
-
¾ cup (95 g) all-purpose flour
-
¼ cup (25 g) unsweetened cocoa powder
-
½ cup (100 g) granulated sugar
-
2 large eggs
-
¼ cup (60 ml) whole milk
-
¼ cup (60 ml) vegetable oil
-
1 teaspoon vanilla extract
-
½ teaspoon baking powder
-
¼ teaspoon baking soda
-
¼ teaspoon salt
For the Chocolate Mousse
-
7 oz (200 g) dark chocolate, finely chopped
-
1½ cups (360 ml) heavy whipping cream, divided
-
2 tablespoons powdered sugar
-
1 teaspoon vanilla extract
-
1 teaspoon powdered gelatin
-
1 tablespoon cold water
For the Glossy Chocolate Glaze
-
7 oz (200 g) dark chocolate, chopped
-
¾ cup (180 ml) heavy cream
-
2 tablespoons unsalted butter
-
2 tablespoons light corn syrup or glucose syrup (optional)
For the Vanilla Cream Decoration
-
¾ cup (180 ml) cold heavy whipping cream
-
2 tablespoons powdered sugar
-
½ teaspoon vanilla extract
-
1 tablespoon mascarpone cheese (optional, for stability)
For the Chocolate Rings
-
5 oz (140 g) dark chocolate or tempered couverture chocolate
-
¼ cup (35 g) finely chopped toasted hazelnuts
-
Edible gold sprinkles (optional)
For the Festive Decorations
-
8 edible golden Christmas stars made from fondant or chocolate
-
16 small red fondant berries
-
16 green fondant holly leaves
-
½ cup (60 g) finely chopped toasted hazelnuts
-
2 oz (55 g) melted white chocolate for drizzling
-
Edible gold luster dust (optional)
Step-by-Step Instructions
Step 1: Prepare the Chocolate Sponge Cake
Preheat your oven to 350°F (175°C) and line a rectangular baking pan, approximately 9 × 13 inches (23 × 33 cm), with parchment paper.
In a large mixing bowl, whisk the eggs and granulated sugar together until the mixture becomes pale, slightly thick, and fluffy.
Add the vegetable oil, milk, and vanilla extract. Mix until smooth and fully combined.
In a separate bowl, sift together the flour, cocoa powder, baking powder, baking soda, and salt.
Gradually fold the dry ingredients into the wet ingredients using a spatula.
Mix gently until a smooth chocolate batter forms. Avoid overmixing, which can make the sponge dense.
Pour the batter into the prepared baking pan and spread it into an even layer.
Bake for approximately 15–18 minutes, or until a toothpick inserted into the center comes out clean.
Allow the cake to cool completely.
Once cooled, use round pastry cutters to cut out 8 circles measuring approximately 3 inches (7–8 cm) in diameter.
Set the sponge circles aside.
Step 2: Prepare the Chocolate Mousse
Place the chopped dark chocolate into a heatproof bowl.
Heat ½ cup (120 ml) of the heavy cream in a small saucepan over medium-low heat until it begins to steam. Do not let it boil vigorously.
Pour the warm cream over the chocolate and allow it to sit for 2 minutes.
Stir gently until the chocolate melts completely and the mixture becomes smooth and glossy.
In a small bowl, sprinkle the gelatin over 1 tablespoon of cold water and allow it to bloom for 5 minutes.
Warm the gelatin gently until completely dissolved, then stir it into the warm chocolate mixture.
Allow the chocolate mixture to cool until lukewarm, making sure it remains fluid.
In a separate bowl, whip the remaining 1 cup (240 ml) of cold heavy cream with the powdered sugar and vanilla extract until soft peaks form.
Gently fold one-third of the whipped cream into the chocolate mixture to lighten it.
Add the remaining whipped cream in two additions, folding carefully until the mousse becomes smooth, airy, and evenly combined.
The mousse should be light, creamy, and rich without feeling heavy.
Step 3: Assemble the Mini Chocolate Cakes
Arrange 8 round pastry rings on a tray lined with parchment paper.
For easier unmolding, line the inside of each ring with acetate cake strips.
Place one chocolate sponge circle at the bottom of each mold.
Spoon or pipe the prepared chocolate mousse over the sponge bases, filling the molds almost to the top.
Use a small offset spatula to smooth the surface.
Gently tap the tray on the counter to remove any large air pockets.
Transfer the cakes to the refrigerator and chill for at least 4–6 hours, or until the mousse has completely set.
For the best results, prepare the cakes the evening before your holiday celebration and refrigerate them overnight.
Step 4: Prepare the Glossy Chocolate Glaze
Place the chopped dark chocolate in a heatproof bowl.
Heat the heavy cream in a saucepan until it just begins to simmer.
Pour the hot cream over the chocolate and allow it to stand for 2 minutes.
Stir gently from the center outward until the mixture becomes smooth and glossy.
Add the softened butter and optional corn syrup or glucose syrup.
Mix until completely incorporated.
Allow the chocolate glaze to cool to approximately 90–95°F (32–35°C). It should remain fluid enough to pour smoothly over the chilled cakes without melting the mousse.
This glaze creates a beautiful glossy chocolate coating, similar to the luxurious finish shown in the photograph.
Step 5: Glaze the Mini Cakes
Carefully remove the chilled cakes from their pastry rings.
Peel away the acetate strips and place the cakes on a wire rack positioned over a baking tray.
Pour the chocolate glaze over each mini cake, starting from the center and allowing it to flow naturally over the sides.
Make sure the top and sides are evenly covered.
Allow the excess glaze to drip off.
While the glaze is still slightly sticky, gently press finely chopped toasted hazelnuts around the bottom edge of each cake.
The crunchy hazelnuts add a wonderful contrast to the smooth chocolate mousse and create the elegant textured border visible in the photo.
Transfer the glazed cakes to the refrigerator for approximately 20–30 minutes to help the chocolate coating set.
Step 6: Make the Decorative Chocolate Rings
For the best appearance, use properly tempered chocolate so the rings hold their shape and develop a beautiful shine.
Melt and temper the dark chocolate according to the chocolate manufacturer’s instructions.
Cut strips of food-safe acetate approximately 1 inch (2.5 cm) wide and long enough to create circles slightly smaller than the diameter of the cakes.
Spread a thin, even layer of tempered chocolate over each acetate strip.
Sprinkle one edge lightly with finely chopped toasted hazelnuts or edible gold decorations.
When the chocolate begins to set but is still flexible, carefully bend each strip into a circular ring, with the chocolate facing inward or outward according to your preferred finish.
Secure the ends gently.
Allow the chocolate rings to crystallize completely at a cool room temperature.
Carefully peel away the acetate.
You should now have delicate, elegant chocolate rings that can stand upright on top of the mini cakes.
Prepare a few extra rings in case any break during assembly.
Step 7: Prepare the Vanilla Cream
In a chilled mixing bowl, combine the cold heavy whipping cream, powdered sugar, vanilla extract, and optional mascarpone cheese.
Beat with an electric mixer until firm peaks form.
The cream should be smooth and stable enough to hold a decorative swirl.
Transfer it to a piping bag fitted with a large star nozzle.
Refrigerate until ready to use.
Step 8: Add the White Chocolate Drizzle
Melt the white chocolate gently using a microwave in short intervals or a double boiler.
Transfer it into a small piping bag and snip off a tiny opening.
Drizzle several thin diagonal lines across the surface of each chocolate mini cake.
Allow the drizzle to set for a few minutes.
The contrast between the dark glossy glaze and delicate white chocolate lines gives the desserts a sophisticated bakery-style appearance.
Step 9: Decorate with Vanilla Cream and Chocolate Rings
Pipe a generous swirl of vanilla whipped cream near the top center of each mini cake.
Carefully position one chocolate ring upright behind the cream swirl.
Use a small amount of melted chocolate or firm cream to help support the ring if necessary.
Make sure the rings are balanced and secure before moving on to the final decorations.
The combination of the glossy cake, elegant chocolate ring, and fluffy cream creates a beautiful three-dimensional dessert.
Step 10: Add the Christmas Stars, Holly Leaves, and Berries
Place one edible golden Christmas star upright in each whipped cream swirl.
Add two small green fondant holly leaves beside the star.
Finish the decoration with two bright red fondant berries.
For an additional festive touch, lightly brush the golden stars with edible gold luster dust.
Arrange the finished cakes on a white serving platter.
The rich chocolate coating, golden accents, red berries, and green holly leaves create a stunning Christmas color palette.
Refrigerate the decorated cakes until ready to serve.
Tips for Perfect Christmas Chocolate Mousse Mini Cakes
1. Choose Good-Quality Chocolate
Chocolate is the main flavor in this dessert, so its quality makes a big difference.
For a rich but balanced flavor, use dark chocolate containing approximately 55–65% cocoa solids.
Milk chocolate can also be used, but the mousse and glaze will be sweeter.
2. Keep the Mousse Light and Airy
When combining the whipped cream with the chocolate mixture, use gentle folding motions.
Overmixing can deflate the cream and produce a dense mousse instead of a soft, airy texture.
3. Chill the Cakes Thoroughly
The mousse must be completely firm before the cakes are removed from their molds.
If the mousse is too soft, the cakes may lose their shape when glazed.
4. Control the Glaze Temperature
A glaze that is too hot may soften or melt the mousse.
A glaze that is too cold may become thick and difficult to spread evenly.
Allowing the glaze to reach the correct consistency is essential for a smooth, glossy coating.
5. Prepare Decorations Ahead of Time
The chocolate rings, fondant stars, holly leaves, and berries can be prepared in advance.
This makes decorating much easier on the day of your Christmas celebration.
6. Handle Chocolate Rings Carefully
Thin chocolate rings are delicate and can break easily.
Use clean, dry hands or food-safe gloves when handling them, and avoid touching them excessively.
Delicious Variations to Try
Christmas Chocolate Orange Mini Cakes
Add 1 teaspoon of finely grated orange zest to the chocolate mousse.
The fresh citrus flavor pairs wonderfully with rich dark chocolate and creates a classic Christmas combination.
Chocolate Hazelnut Mousse Cakes
Fold 2 tablespoons of smooth hazelnut spread into the chocolate mousse mixture before adding the whipped cream.
Decorate with extra toasted hazelnuts for a delicious nutty flavor.
White Chocolate Christmas Mini Cakes
Replace the dark chocolate mousse with white chocolate mousse and finish with a white chocolate glaze.
Decorate with red berries, green holly leaves, and golden stars for a beautiful snowy Christmas appearance.
Coffee Chocolate Mousse Cakes
Add 1 teaspoon of instant espresso powder to the warm cream before mixing it with the chocolate.
Coffee enhances the chocolate flavor and adds a sophisticated touch to the dessert.
Raspberry Chocolate Mini Cakes
Add a thin layer of raspberry jam or raspberry compote between the chocolate sponge and mousse.
The slightly tart raspberry flavor balances the rich chocolate beautifully.
How to Store Christmas Chocolate Mousse Mini Cakes
Because these cakes contain whipped cream and chocolate mousse, they must be stored in the refrigerator.
Refrigerator: Store the cakes in an airtight container for up to 3 days. For the best appearance, add the decorative chocolate rings and fondant decorations shortly before serving.
Freezer: The undecorated mousse cakes can be frozen for up to 1 month. Wrap them carefully and store in freezer-safe containers. Thaw overnight in the refrigerator before glazing and decorating.
Serving: Remove the cakes from the refrigerator approximately 10–15 minutes before serving to allow the chocolate flavors to develop while keeping the mousse pleasantly chilled.
Avoid leaving the decorated cakes at room temperature for extended periods.
Frequently Asked Questions
Can I make these mini chocolate cakes the day before Christmas?
Yes! In fact, making them one day in advance is an excellent idea. The mousse will have plenty of time to set, and the flavors will develop beautifully overnight.
Can I make the mousse without gelatin?
Yes, but the mousse may be softer and more difficult to unmold. If omitting gelatin, use individual dessert cups or a stable chocolate mousse recipe specifically designed for molded desserts.
Can I use milk chocolate instead of dark chocolate?
Yes. However, milk chocolate contains more sugar and usually produces a sweeter dessert. You may need to adjust the chocolate-to-cream ratio to maintain the correct mousse texture.
What can I use instead of pastry rings?
Silicone mini cake molds work well. Choose molds with smooth sides and a similar diameter to achieve an elegant, professional appearance.
Can I make these mini cakes without chocolate rings?
Absolutely. Although the chocolate rings create a dramatic presentation, the mini cakes will still look beautiful decorated with vanilla cream, golden stars, holly leaves, and berries.
Are these cakes suitable for a Christmas dessert table?
Definitely! Their individual serving size makes them especially convenient for holiday parties, Christmas dinners, and elegant dessert buffets. Keep them refrigerated until serving time.
Why You’ll Love This Recipe
These Christmas Chocolate Mousse Mini Cakes offer the perfect balance of flavor, texture, and festive beauty.
The soft chocolate sponge provides a delicious foundation, while the smooth chocolate mousse adds a rich, creamy center. The glossy dark chocolate glaze creates an elegant finish, and the crunchy hazelnut coating adds delightful texture.
Meanwhile, the fluffy vanilla cream, delicate chocolate rings, golden stars, and colorful Christmas decorations transform each mini cake into a little edible holiday masterpiece.
Unlike large cakes that need to be sliced and served, these individual desserts are already perfectly portioned, making them ideal for special occasions.
They also offer plenty of opportunities for creativity, allowing you to personalize the flavors and decorations to match your holiday celebration.
Final Thoughts
If you’re looking for a Christmas dessert that combines elegance, rich chocolate flavor, and unforgettable presentation, these Christmas Chocolate Mousse Mini Cakes are a wonderful choice.
Their luxurious layers, glossy chocolate coating, crunchy hazelnut edges, and beautiful holiday decorations make them a standout addition to any Christmas celebration.
Whether you’re preparing a sophisticated Christmas dinner, hosting a festive gathering, or simply treating your family to something special, these mini cakes are sure to impress.
Make these stunning Christmas Chocolate Mousse Mini Cakes part of your holiday baking tradition and bring a little extra sweetness and magic to your Christmas table!